Roughly two months ago we set up a reverse proxy for a Synology NAS, what was described in this article, to make Synology NAS services available to users outside my private network. But since we didn’t want to use a VPN solution, to not bother our users with another login layer, we went the route of making the Synology DSM login accessible to the public.
But like any other public service out there it’s now subject to the usual requests from web crawlers, -scanners or bot networks. These bots are constantly screening the whole web and are trying to access common APIs, files etc., that are usually found on public web servers. These are non-targeted attacks and are not a problem with proper security in place.
But at one point, these non-targeted attacks become more targeted when these bots figure out which service is hosted on the server. In our case, they figured out that there is a publicly reachable Synology DSM login page behind my domain. And since then this login is constantly under attack.
How this looks like and what we can do to mitigate the attacks is described in the following article.
Table of Contents
Initial situation and problem
As briefly mentioned above, some malicious actor(s) figured out that there is a publicly reachable Synology DSM login page behind my domain (Figure 1). They found it most likely due to some usual web screenings.

Figure 1: The Synology DSM login page directly reached via ‘mydomain.com’.
One might now ask: “Why are you even exposing that login? Isn’t that a security risk?”. While it’s totally correct that one should not expose that login for private usage, it’s a totally different story when you serve Synology services to multiple users outside the private network. If you want to make the use of e.g. Synology Drive or Synology Photos hassle-free for your users you are basically forced to expose the DSM login.
But that’s not an issue if proper security measures are in place (what we already set up before). Imagine your email provider (e.g. Gmail): Basically everyone who knows your email address can try to log into your account on the publicly reachable Gmail webpage. But due to proper security measures (secure passwords, MFA, ban after x failed logins etc.) that’s not an issue.
But why is it an issue here? It’s not really an issue but let’s look at it closer by inspecting the Nginx logs (Figure 2).

Figure 2: The Nginx log showing a non-targeted and two semi-targeted requests.
Let’s look closer at the second request from the IP 64.62.156.66 in figure 2. That’s just some non-targeted request. But if we look
at the first and third request in figure 2 from the IPs 71.63.186.171 and 72.53.210.15 we see some semi-targeted requests,
since it’s not a random request, but it’s directly targeting the Synology API as seen in GET //webapi/auth.cgi?api=SYNO.API.Auth.version=3%method=login....
At first this sounds alarming but if we look closer into these two requests we can see further &account=admin&passwd=fashion or
&account=admin&passwd=soccer1. So they are just trying to log into the default admin account (called “admin”) using some standard passwords.
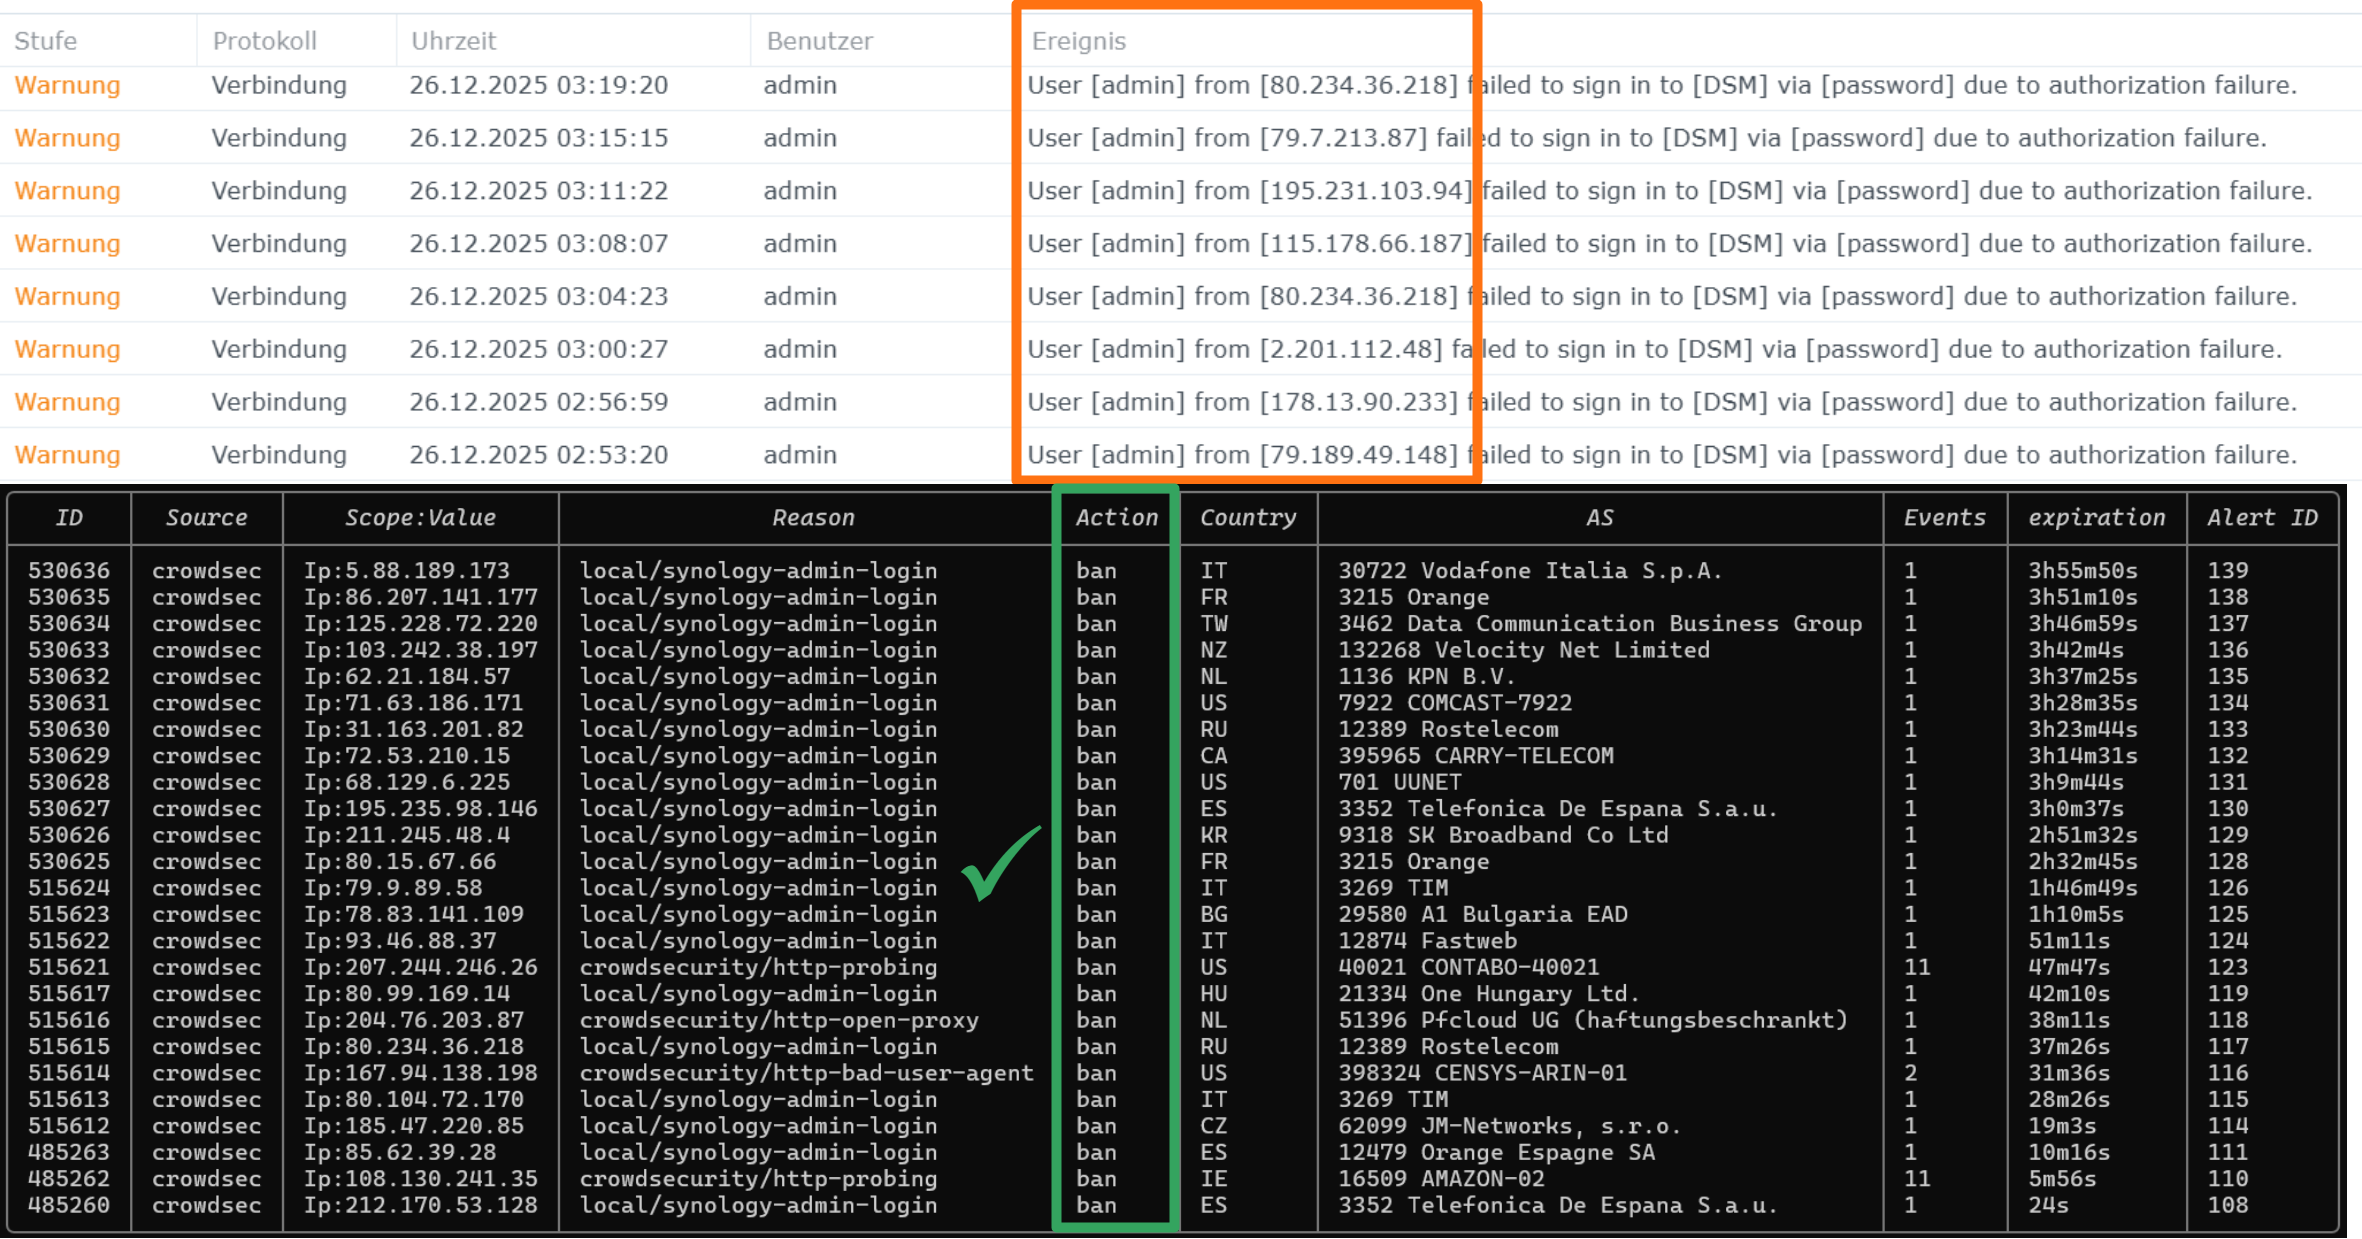
Of course, the “admin” account is deactivated, as Synology suggests. So there is no real danger since they will never be able to log into the admin account, but it’s a bit annoying what becomes clear when we take a look into our DSM connection logs (Figure 3).

Figure 3: The DSM connection logs.
So the log is constantly flooded with failed logins from changing IP addresses, which creates a lot of noise and makes troubleshooting for other issues harder.
So our aim is to get rid of these login attempts to prevent the constant hammering on the login page and to make our logs clean again.
Overview of measures to prevent login attempts on the admin account
So there are basically two properties of these login attempts that we will use to mitigate them:
- They are always targeting the admin account
- IP addresses are changing between the requests
The first point works in our favour, since all requests have that in common, and we can use it to create the following rule:
“Since I deactivated the admin account called “admin”, and all my users don’t even know there exists an account called “admin”, we treat every request that targets “admin” as malicious and block it.”
The second point makes it a bit tough, since we can not just use a simple IP ban rule since every IP is (mostly) used only once.
So in the following we will set up two security measures:
- Block every request that targets the “admin” account
- Ban the attacker IPs if they try it again using an already used IP
Let’s start with blocking requests that target the “admin” account.
Blocking requests targeting the admin account on reverse proxy level
Fortunately, it’s straightforward to block requests based on certain rules using the Nginx config. When we recall our Nginx conf that we prepared in this article, we just need to add a few lines.
At first, we need to check if the request that is sent to Nginx uses admin as the account variable $arg_account.
This is done right at the top of the config and provides us with the $block_admin variable that can be further used.
This map statement can also be extended. So if you see in future that someone is hammering a “root” account for instance, then you just add
root 1; to the map statement.
map $arg_account $block_admin {
    default 0;
    admin   1;
}
Then we need to evaluate the $block_admin variable, which is done in our location block. We use the HTTP status code
444 since this will result in no response and drops the connection. So bot requests will just be sent to the void, and they get nothing in return.
server {
    ...
    location / {
        if ($block_admin) {
            return 444;
        }
        ...
    }
}
This results in this final config that I am currently using:
[Click to see full config]
map $arg_account $block_admin {
    default 0;
    admin   1;
}

server {
    listen 80;
    server_name mydomain.com;

    # increase upload size limit
    client_max_body_size 1000G;

    # Redirect HTTP to HTTPS
    return 301 https://$host$request_uri;
}

server {
    listen 443 ssl;
    server_name mydomain.com;

    http2 on;

    # port 443 only used by mobile apps, therefore, 5 GB limit should be sufficient
    # the stream on port 6690 is unlimited
    client_max_body_size 5G;

    ssl_certificate /etc/letsencrypt/live/mydomain.com/fullchain.pem;
    ssl_certificate_key /etc/letsencrypt/live/mydomain.com/privkey.pem;

    # don't show server information (e.g. NAS name)
    server_tokens off;

    # from https://github.com/trimstray/nginx-admins-handbook/blob/master/doc/RULES.md#hardening
    ssl_protocols TLSv1.2 TLSv1.3;
    ssl_ciphers "ECDHE-ECDSA-AES256-GCM-SHA384:ECDHE-RSA-AES256-GCM-SHA384:ECDHE-ECDSA-CHACHA20-POLY1305:ECDHE-RSA-CHACHA20-POLY1305:ECDHE-ECDSA-AES128-GCM-SHA256:ECDHE-RSA-AES128-GCM-SHA256:DHE-RSA-AES256-GCM-SHA384:DHE-RSA-CHACHA20-POLY1305:DHE-RSA-AES128-GCM-SHA256";
    ssl_prefer_server_ciphers off;

    location / {
        if ($block_admin) {
            return 444;  # Corresponds to "no response" and closes the connection
        }
        proxy_pass <TAILSCALE_NAS_IP>;
        proxy_ssl_verify off;   # can be used since it corresponds to the connection VPS<->NAS, which goes through secured VPN
        proxy_set_header Host $host;
        proxy_set_header X-Real-IP $remote_addr;
        proxy_set_header X-Forwarded-For $proxy_add_x_forwarded_for;
        proxy_set_header X-Forwarded-Proto $scheme;
        # from https://github.com/trimstray/nginx-admins-handbook/blob/master/doc/RULES.md#hardening
        proxy_set_header X-Original-URL "";
        proxy_set_header X-Rewrite-URL "";
        proxy_set_header X-Forwarded-Server "";
        proxy_set_header X-Forwarded-Host "";
        proxy_set_header X-Host "";
        # end from
        proxy_connect_timeout 60s;
        proxy_read_timeout 600s;
        proxy_send_timeout 600s;
    }
}
This new Nginx configuration is now blocking requests on the admin account on reverse proxy level. So they do not reach my NAS anymore. That’s already a huge step but the requests still reach my VPS. So in the next step I want to create further ban rules to ban IPs on the VPS firewall level.
Banning malicious IPs using CrowdSec
As mentioned in the first section and visible in the Nginx logs (Figure 2), there are random non-targeted scanning requests and semi-targeted requests on the admin account, sent from various IP addresses.
Databases of malicious IP addresses are maintained by services like CrowdSec. CrowdSec collects information of malicious IPs in multiple contexts from multiple users around the world.
We will use CrowdSec as well to achieve the following:
- Apply blocklists of already known malicious IPs
- Create a scenario to block/ban IPs targeting the Synology admin account
- Monitor alerts and ban decisions
Installing CrowdSec
The installation is performed according to the official CrowdSec documentation on the VPS. As a bouncer we select the default iptables bouncer. We then put known “clean” IPs on a whitelist, and enroll in the CrowdSec console. The last step is optional, but it makes adding blocklists easy, and you get access to some monitoring features. It’s also free in the basic plan.
I won’t go much into detail regarding the CrowdSec console since we want to focus on our “admin login” issue.
Creating a CrowdSec scenario to ban admin logins
As mentioned earlier we are already blocking admin logins on the reverse proxy level to stop forwarding to the NAS but the requests are still reaching the VPS/Nginx. By creating a custom scenario we can detect these admin logins and put the respective IPs on a ban list. Unfortunately, this won’t stop the first request from a new IP but at least we are banning consecutive requests.
To create a new scenario, we create a new yaml file in this directory on the VPS:
/crowdsec/scenarios/local/synology-admin-login.yaml
You can either directly create it on the VPS, or use a Git repository to do it. I recommend the Git approach as described here.
The synology-admin-login.yaml looks as follows:
type: trigger
name: local/synology-admin-login
description: "Immediate ban on Synology admin login attempt"
filter: |
  evt.Meta.log_type == "http_access-log"
  && evt.Parsed.file_name == "auth.cgi"
  && evt.Parsed.http_args contains "method=login"
  && evt.Parsed.http_args contains "account=admin"
groupby: evt.Meta.source_ip
blackhole: 5m
labels:
  remediation: true
  service: http
  confidence: 3
We use type: trigger since this will directly trigger at an event as opposed to other types like leaky (bucket) for
instance. The filter applies the logic, like looking into auth.cgi and search for account=admin when the request
performs method=login. By assigning labels: remediation: true, alerts triggered by this scenario are evaluated by the local
CrowdSec profile. By default, the profile bans malicious IPs for 4 hours.
Monitoring CrowdSec
When our new scenario and/or general CrowdSec scenarios create an alert (i.e. when they are triggered), an entry is written to the alerts
list. The alerts list can be inspected using sudo cscli alerts list and looks as follows (Figure 4).

Figure 4: The CrowdSec alerts list.
When an alert triggers a ban, which is decided by the local CrowdSec profile, an entry is added to the decisions list (Figure 5) that can be inspected
using sudo cscli decisions list.

Figure 5: The CrowdSec decisions list.
These logs tell us that our scenario successfully creates alerts based on our custom rule, which directly leads to the ban of malicious IPs.